How to Use AI to Edit Photos (Tested: What Each Tool Actually Changes)

To edit a photo with AI, upload the photo to an AI editor and describe the change in plain language — “remove the red bicycle, keep everything else the same.” The editor rebuilds the pixels you pointed at and leaves the rest alone. That is the whole skill. What decides whether the result looks real is not the tool you pick but how specific your instruction is, and whether you check the result at full zoom before you export it. I tested the same three edits on one photo — removing an object, swapping the background, and recoloring a coat — and scored what each one preserved and what it quietly changed. The best edit scored 9.5 out of 10. The worst looked perfect at thumbnail size and fell apart at 100% zoom.
How I tested this
I started with a test photo of a woman in a yellow raincoat holding a red umbrella on a rainy street, with a red bicycle parked behind her. I then ran three edit briefs on it with a current AI image editor: remove the bicycle, replace the street with a sunny park, and change the yellow coat to navy blue. I inspected every result at full size and scored two things separately: did the requested change happen, and did everything else stay untouched? The scores below come from that test. The vendor apps named in this guide — ChatGPT, Gemini, Photoshop, Google Photos, and Canva — were not tested in a signed-in session; their steps, prices, and limits come from their own help and pricing pages, checked in November 2026. The prompt formula and the check loop transfer across all of them, because every one of these tools is doing the same job: regenerating the pixels you point at.
What can AI photo editing actually do?
AI photo editing comes in three kinds, and most real edits mix all three. Knowing which kind you are using tells you what to check afterwards.
- Assistive edits. The AI helps a conventional adjustment. Magic Eraser removes a distraction, Photo Unblur sharpens a soft shot, Portrait Light re-lights a face. Nothing is invented; the tool works with pixels already in the photo.
- Generative edits. The AI creates new pixels. Generative Fill adds or replaces part of a scene, Reimagine swaps a background, Generative Expand extends the canvas. The new pixels are plausible, not photographed — which is exactly why they need checking.
- Conversational edits. You describe the change in a chat. ChatGPT Images and Gemini’s Nano Banana take “remove the bicycle” and do the selecting and the filling for you. No brushes, no masks, no layers to learn.
A typical edit uses all three at once: erase the photobomber (assistive), fill the gap it leaves (generative), and do it all by typing one sentence (conversational). If you want to create images from scratch instead of editing photos you already have, our roundup of the best AI image generators covers the generation side. This guide is about editing a photo that already exists.
The prompt formula that works: change this, preserve that
Every AI photo editor responds to the same structure, whether it is a chat box or a prompt field. Google’s own prompting guide for its image models puts it as [Subject] + [Action] + [Location/context] + [Composition] + [Style]. For edits, I use a shorter version that survived every test in this guide: Change + Preserve. Name exactly what changes, then name exactly what must not change.
Here is the prompt I used for the first test in this guide, word for word: “Remove the red bicycle parked behind the woman. Keep the woman, her yellow raincoat, the red umbrella, the wet pavement, and the shopfronts exactly the same. Fill the gap with matching wet pavement.” Three rules sit behind it. First, one change per prompt — stacking three changes in one sentence is how faces drift. Second, name the object, not the area: “the red bicycle,” not “the thing on the right.” Third, always add a preserve clause, because an editor with no preserve clause treats the whole image as fair game.
Test 1: Can AI remove an object cleanly?
The brief: “Remove the red bicycle completely from this photo. Keep everything else exactly the same: the woman, her yellow raincoat, the red umbrella, the wet pavement, the shopfronts. Fill the space where the bicycle was with matching wet pavement and sidewalk.”
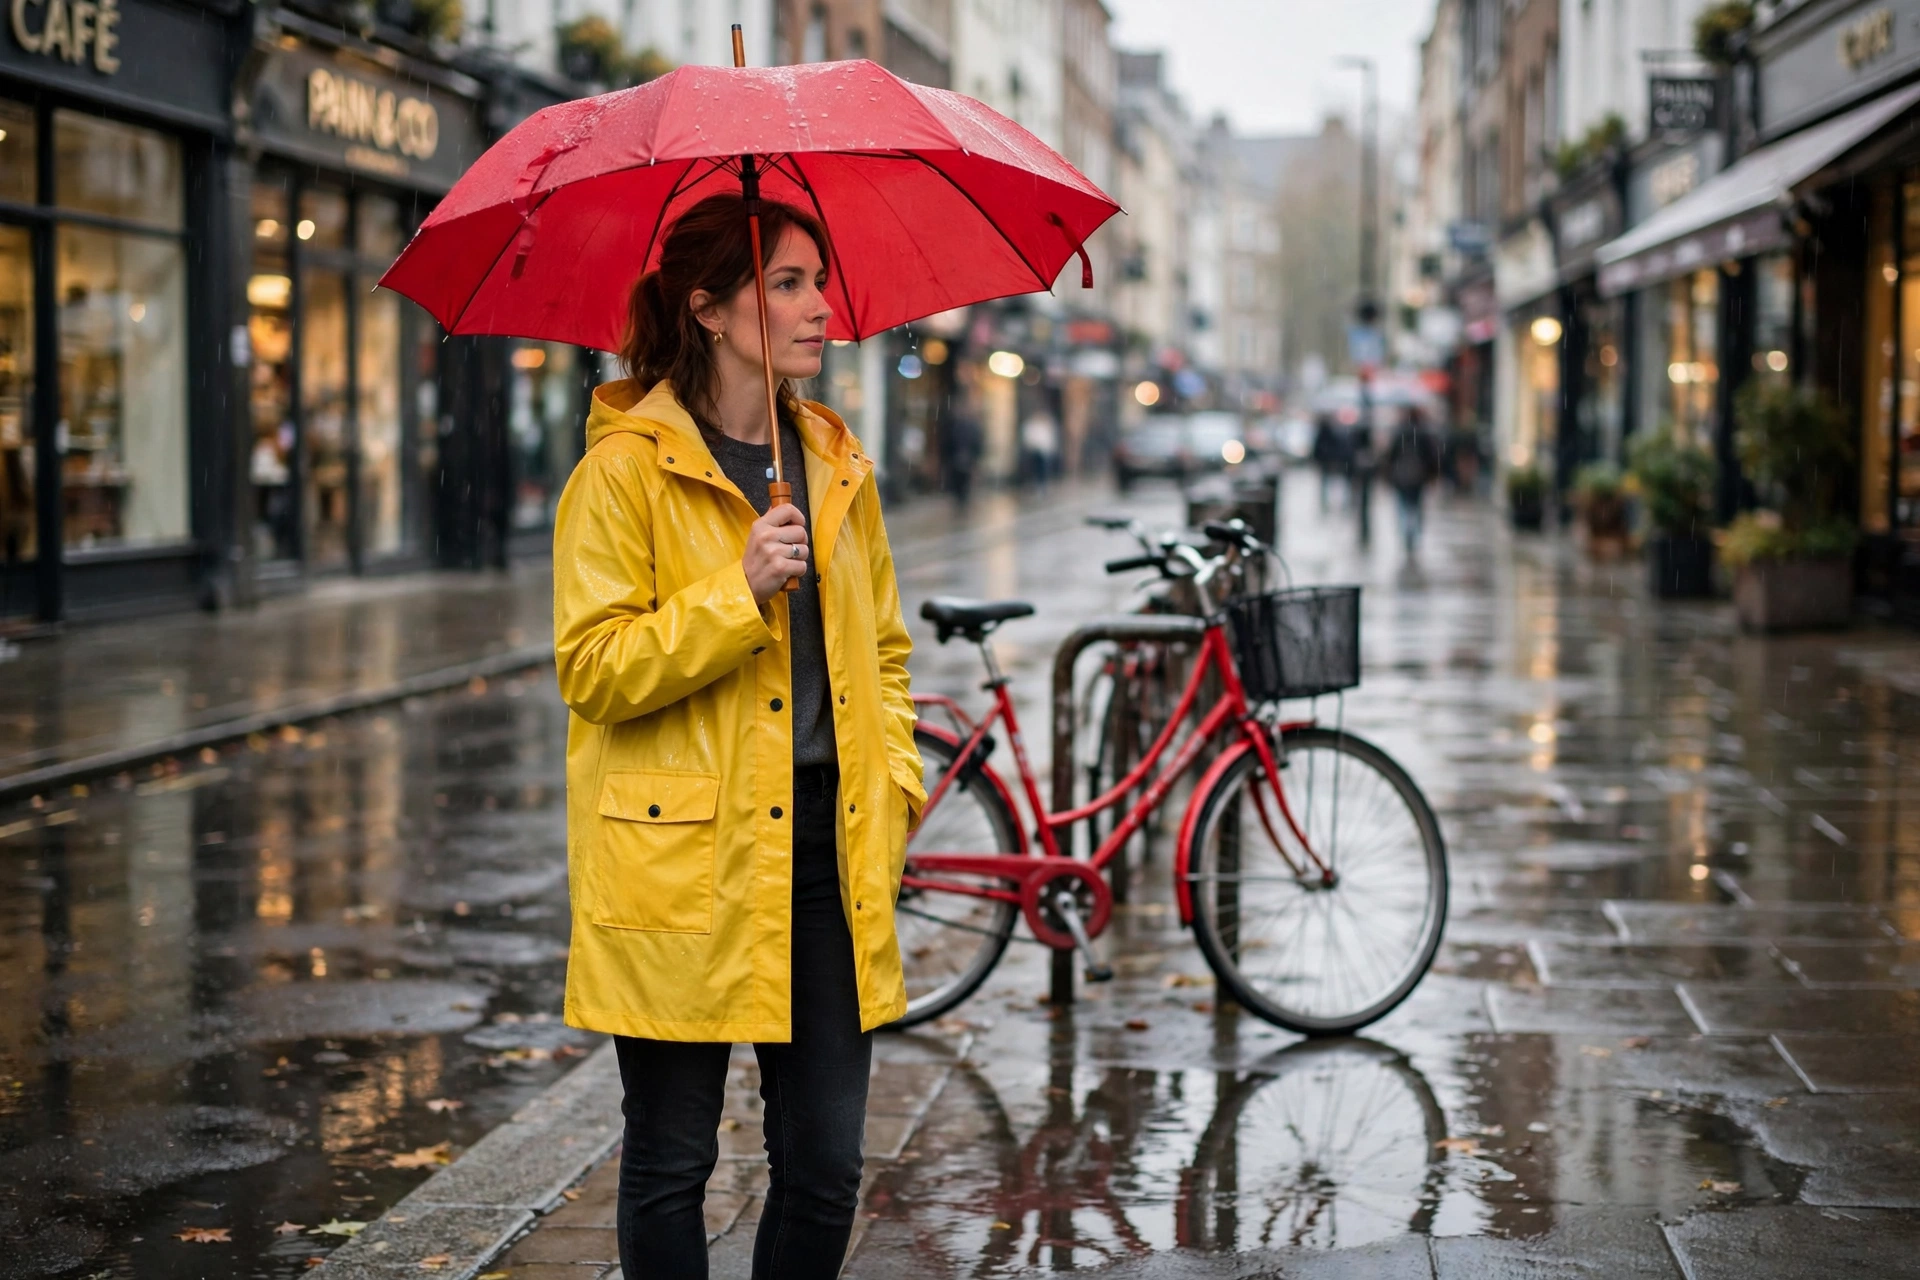
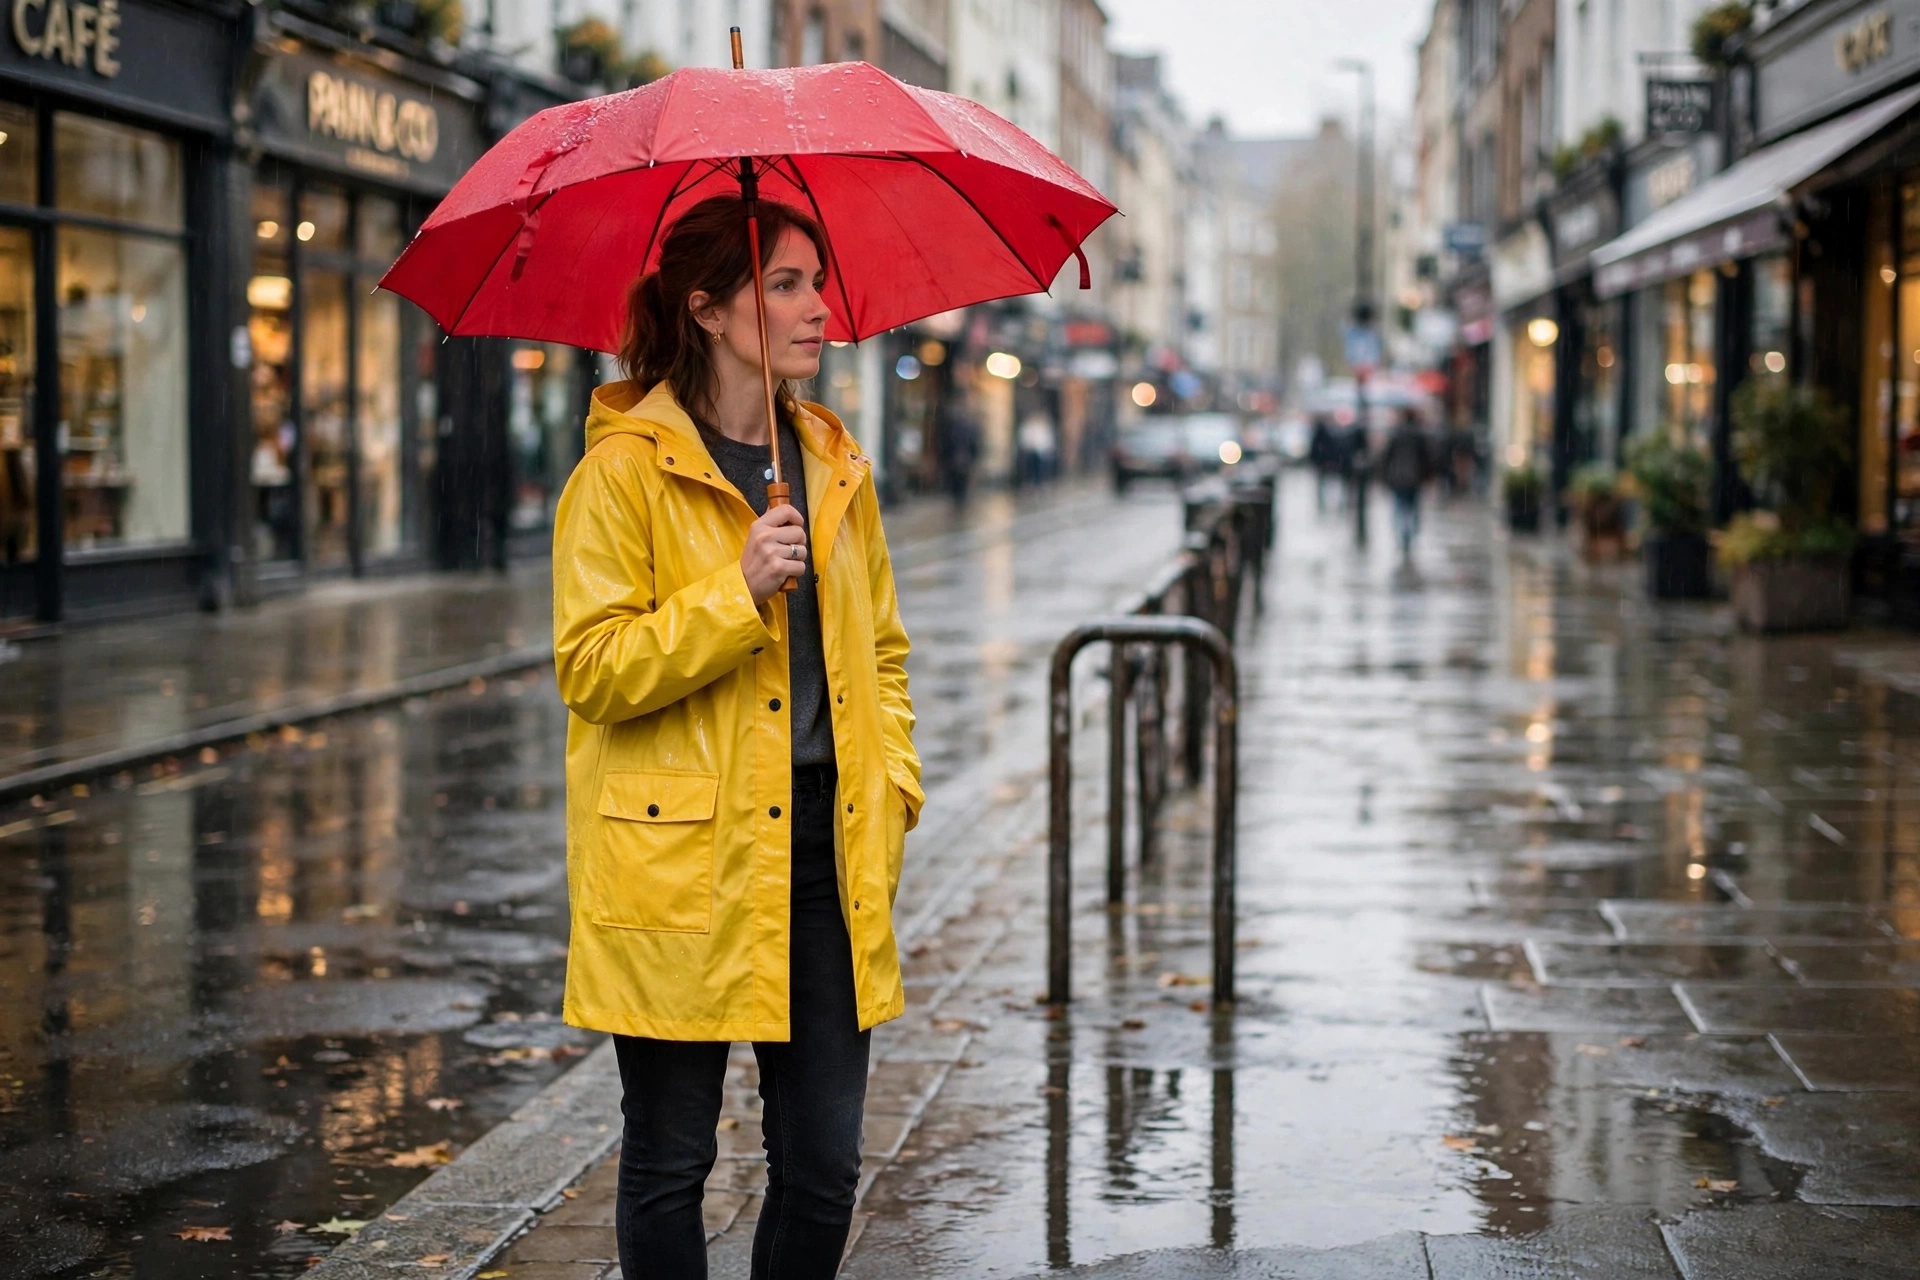
What happened: The bicycle is gone. The bike rack it was locked to stayed, the wet pavement filled in with matching reflections, and at a glance the photo looks untouched. Zoom to 100% and two things show: the woman’s face shifted slightly — her features are a touch softer than the original — and the shopfront sign lettering on the left is subtly redrawn. Neither is visible at normal viewing size, but both are the signature of how these editors work: they regenerate the whole image, not just the masked area, so untouched parts can drift.
Scores: edit success 10/10, preservation 8/10. Verdict: object removal is the most reliable AI edit there is. Use it for photobombers, bins, signs, and stray limbs. Check faces and text at full zoom afterwards — those are the two things that drift first.
Test 2: Can AI swap a background without breaking the photo?
The brief: “Keep the woman, her yellow raincoat and the red umbrella exactly the same, but replace the rainy city street background with a sunny green park: grass, trees, a walking path, bright sunlight. Keep the wet pavement gone; she now stands on a dry park path.”
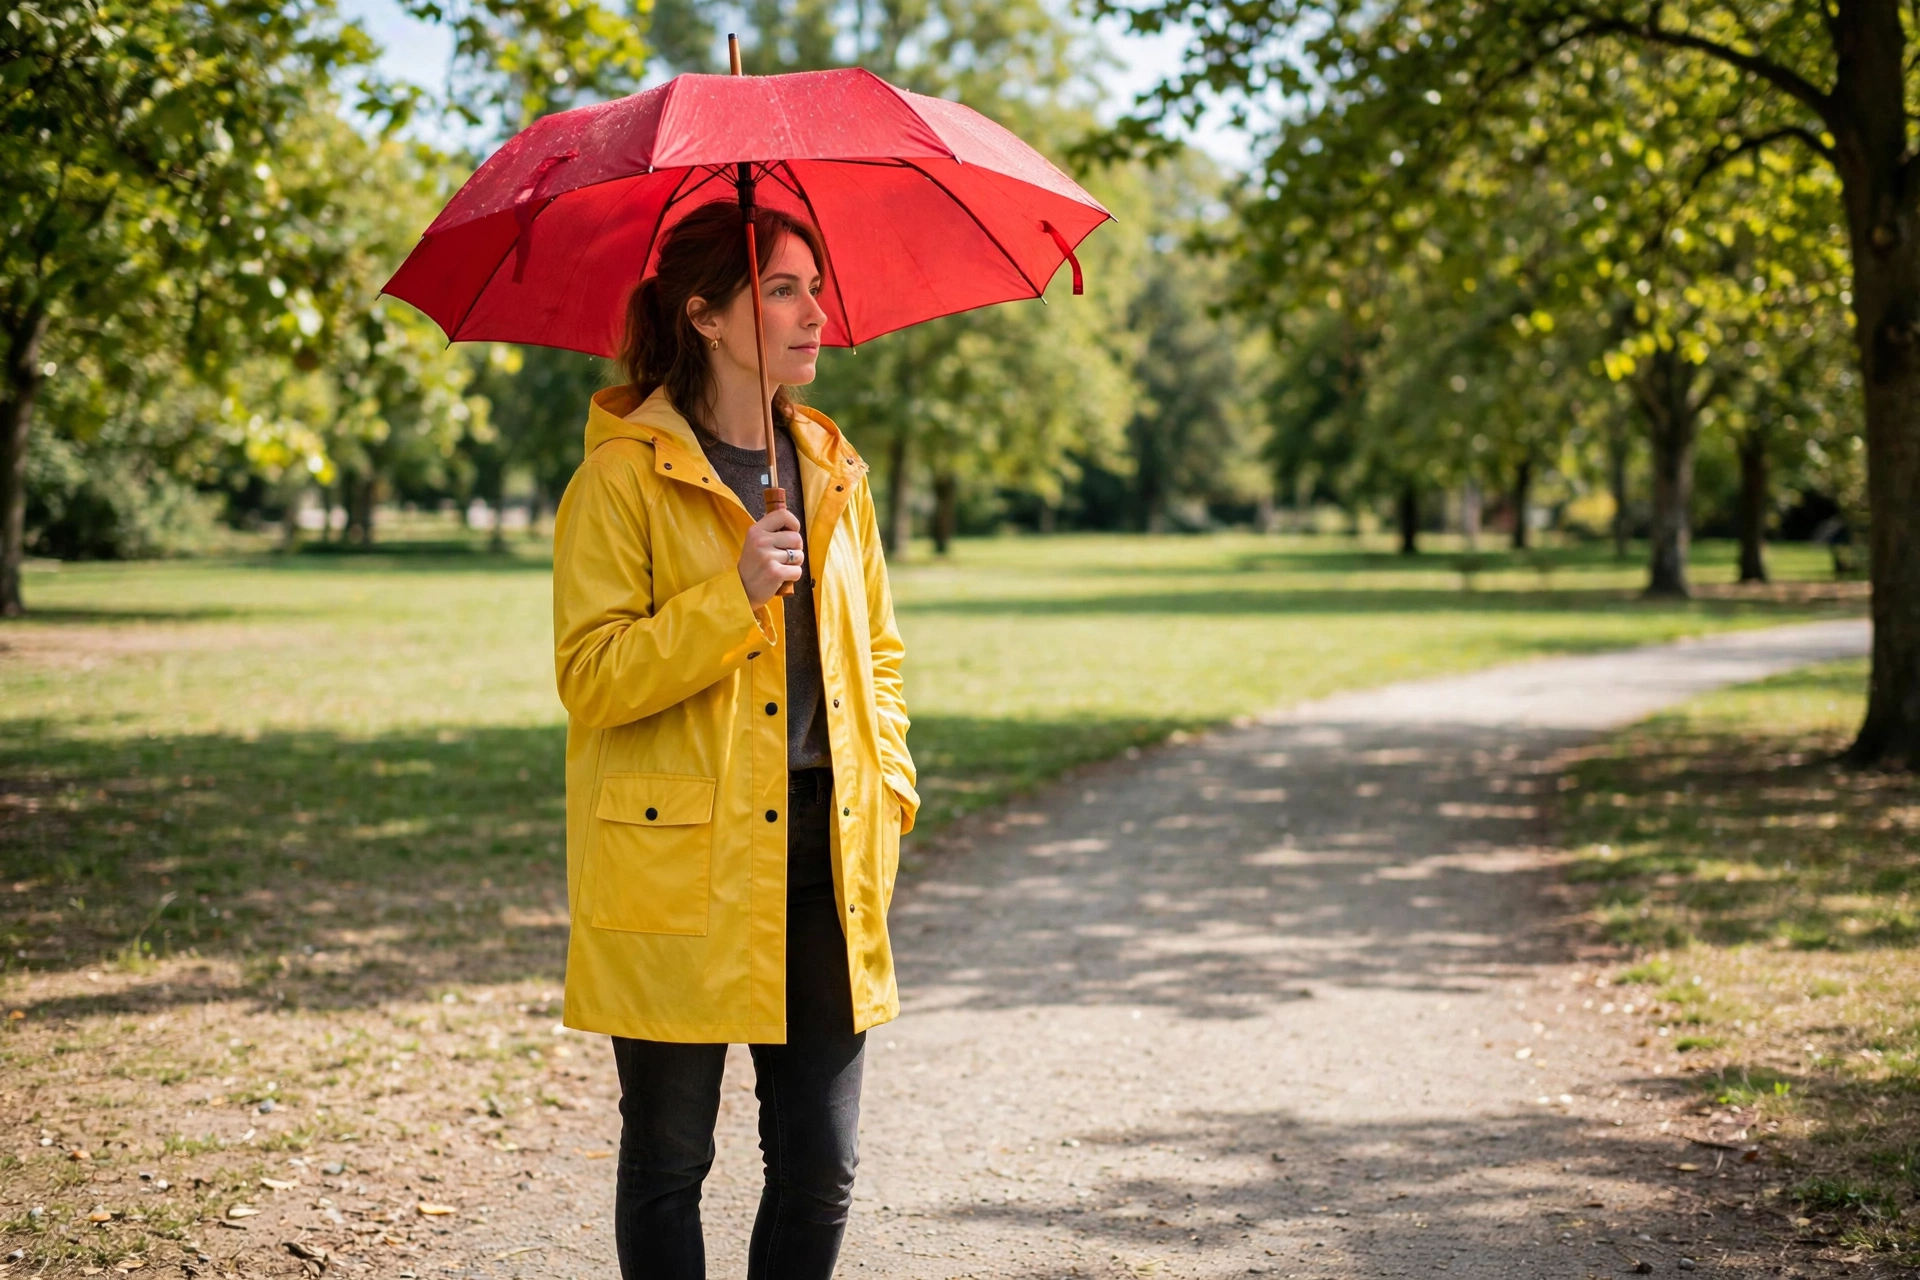
What happened: The swap itself is flawless: green park, trees, a dry path, warm sunlight. The problem is everything the editor kept. The woman still holds a red umbrella — in bright sunshine. The umbrella still has rain droplets on it. Her yellow coat is still wet and shiny. The photo is now a mismatch the eye catches in half a second: the subject belongs to a rainy day and the background belongs to a sunny one.
Scores: edit success 10/10, coherence 6/10. Verdict: background swaps work when the subject is weather-neutral. If the subject carries weather — an umbrella, a wet coat, snow on shoulders — either change the subject too (“put the umbrella down, dry coat, sunny day”) or pick a background that matches the weather the subject is already in. The fix is one more sentence in the prompt, not a different tool.
Test 3: Can AI recolor one thing and leave the rest alone?
The brief: “Change only the woman’s yellow raincoat to a navy blue raincoat, same style, same cut, same buttons and pockets. Keep everything else exactly the same: her face, hair, the red umbrella, the red bicycle, the wet street, the shopfronts.”
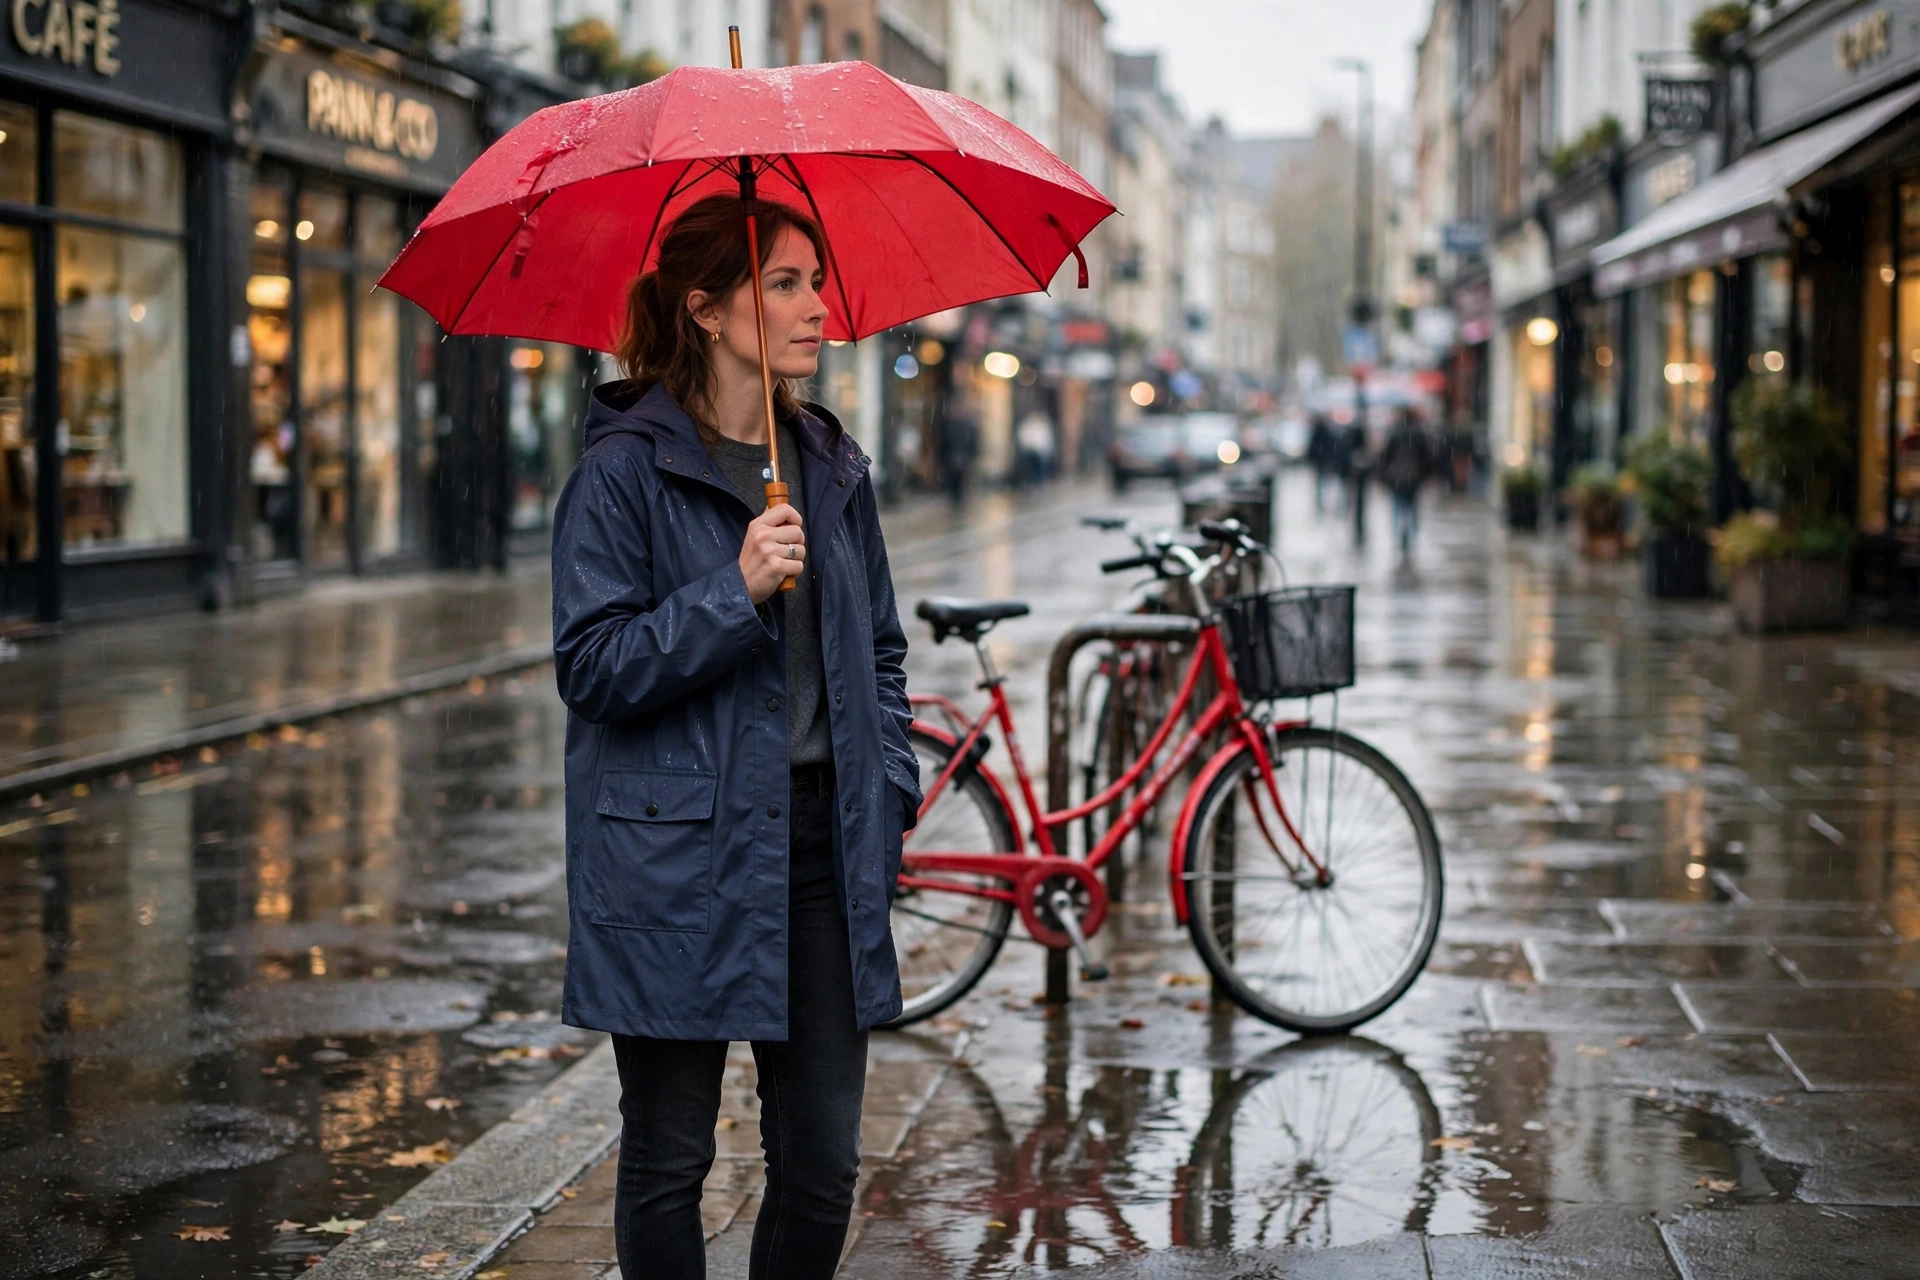
What happened: The best result of the three. The coat is navy blue with the same cut, buttons, and pockets; the woman’s face, the red umbrella, the red bicycle, and the wet street are all untouched — even the reflections in the puddles kept the red bicycle’s shape. Recoloring works so well because the editor only has to change hue, not shape or structure.
Scores: edit success 10/10, preservation 9.5/10. Verdict: recoloring is the safest AI edit. Change a shirt, a wall, a car, a product color — and always name the exact shade (“navy blue,” not “blue”), because “blue” alone can land anywhere from sky to teal.
Which AI photo editor should you use?
Pick by the job, not by the brand. Prices and limits below were checked in November 2026 against the vendors’ own pages and pricing coverage.
| Tool | Best for | How you edit | Cost and limits (Nov 2026) |
|---|---|---|---|
| ChatGPT Images | All-round edits in plain language | Upload a photo, describe the change in chat | Free plan with limits; Plus $20/mo. OpenAI’s newest image model, GPT Image 2.6, arrived in November 2026. |
| Gemini (Nano Banana 2 / Pro) | Edits that must keep a face or character consistent | Upload + prompt in the Gemini app; up to 14 reference images | Nano Banana 2 included on the free plan; Nano Banana Pro needs a Google AI plan (Pro $19.99/mo). API price: Pro $0.134 per image at 1K or 2K. |
| Photoshop Generative Fill | Precise, layer-level work | Select an area, type a prompt, pick from the variations | Single-app plan $22.99/mo with 25 generative credits a month; a Firefly-model fill costs 1 credit, a Nano Banana Pro fill costs 40. |
| Google Photos Magic Editor | Quick phone snapshots | Tap, brush, or type in the Photos app | Magic Eraser, Unblur, and Portrait Light are free and uncapped; generative Magic Editor saves are capped at 10 a month for non-Pixel users (unlimited on Pixel or Google One 2TB+, $9.99/mo). |
| Canva Magic Edit | Social posts and marketing graphics | Brush the area, describe the replacement | Magic Edit is a Canva Pro feature; Pro is $144/year billed annually. See our Canva vs Adobe Express comparison for the full trade-off. |
Two traps hide in that table. First, Photoshop’s cheapest plan is the worst value for AI editing: the $22.99 single-app plan includes only 25 generative credits a month, while the $19.99 Photography plan includes 1,000 — so if you edit with AI often, the cheaper plan is the better one. Second, the model you pick inside Photoshop matters more than the plan: a Firefly fill costs 1 credit and a Nano Banana Pro fill costs 40, so one premium fill can eat a month of the single-app allowance. For portraits specifically, AI headshot generators are a cheaper, narrower alternative to a full editor.
How to edit a photo with AI, step by step
- Start from a copy. Duplicate the original before you edit anything. The AI overwrites pixels; if you hate the result, you want the untouched file one click away.
- Pick the tool by the job. Phone snapshot → Google Photos. Precise, layered work → Photoshop. “Just do what I say” → ChatGPT or Gemini. A social graphic → Canva.
- Make the selection, or write the brief. Brush tools: paint only what changes, and keep the brush tight — a loose selection is how backgrounds bleed into subjects. Chat tools: one change plus a preserve clause, using the formula above.
- Generate, then pick the best variation. Photoshop offers several variations per fill; chat tools give one — regenerate if the first is off, and change one word rather than rewriting the whole prompt.
- Zoom to 100% and check four things. Faces, hands, text, and edges/shadows. Those four are where AI edits fail, in that order.
- Export in the right format. PNG or WebP for graphics and anything with text; JPEG at quality 85 or higher for photos. Save the edited copy under a new name and keep the original.
Copy-paste prompts for the 6 most common edits
Replace the bracketed parts with your own details. Each one follows the Change + Preserve formula.
- Remove an object: “Remove [the red bicycle] completely. Keep everything else exactly the same. Fill the gap with matching [wet pavement].”
- Replace a background: “Replace the background with [a sunny green park]. Keep the person exactly the same, including their pose, clothes, and the lighting on their face.”
- Recolor one thing: “Change only the [raincoat] from [yellow] to [navy blue]. Same shape, same texture, same lighting. Do not change anything else.”
- Extend the canvas: “Extend this photo to the left by 30%, continuing the [street scene] naturally. Keep the existing photo untouched.”
- Clean up a portrait: “Remove the blemish on [the left cheek] and soften the under-eye shadows slightly. Keep the skin texture natural — do not smooth the whole face.”
- Remove text you own: “Remove the text on [the sign] and fill it with the matching background. Do not alter anything else.” Only remove watermarks on images you own; removing someone else’s watermark is not yours to do.
If you would rather do the same job by hand, GIMP’s background-removal tools walk through the manual route, and our Darktable vs Lightroom comparison covers the traditional editors that pair well with an AI step. Windows users can also try the AI tools built into Microsoft Paint, including background removal and Generative Erase.
What AI photo editing gets wrong
- It invents detail. Anything the AI fills in is a guess. Reflections, shadows, and the far side of a removed object are the first places guesses show — look there first at 100% zoom.
- Faces drift. Regeneration softens features and can shift a likeness slightly, as it did in my Test 1. Never use an AI-edited photo as ID or evidence of what a person looked like.
- Text gets redrawn. Signs, labels, and logos are redrawn from scratch, not preserved. Check every letter; a single wrong character is the easiest AI tell there is.
- Light does not match. A background swap that changes the weather or time of day leaves the subject lit wrong — the sunny-park umbrella in Test 2 is the textbook case.
- It changes things you did not ask about. The whole image is regenerated, so compare the result against the original side by side instead of trusting your memory of what was there.
The rules: copyright, disclosure, and honesty
Editing a photo you own is legal. What changes is what you can claim about the result. The U.S. Copyright Office’s January 2025 report on AI and copyright is clear that a prompt alone does not make you the copyright owner of an AI-generated image — purely AI-generated material without human authorship is not protected, so an edit that is mostly the model’s work carries weaker protection than your own photograph. Adobe, for its part, automatically attaches Content Credentials to images created in Firefly — a “nutrition label” showing that AI was used — and the same provenance idea is spreading across the industry.
Three rules cover the rest. Disclose AI edits when the photo is presented as evidence, journalism, or a real record — a cleaned-up holiday photo needs no note; an edited photo in a listing, a report, or a news post does. Never edit a photo of a real person to mislead — face swaps, fake locations, and removing context that changes what happened are off limits. And keep the original file: every edit in this guide starts from a copy, so the unedited photo always exists to settle an argument.
FAQs
Yes. Google Photos’ Magic Eraser, Photo Unblur, and Portrait Light are free and uncapped, and its generative Magic Editor gives non-Pixel users 10 saves a month. ChatGPT and Gemini both include image editing on their free plans with usage limits. Photoshop has no free plan — only a 7-day trial — and its single-app plan includes just 25 generative credits a month, so heavy AI editing gets expensive fast.
Google Photos, for phone snapshots: the tools are one tap away and the free ones are uncapped. If you would rather type what you want than learn brushes and masks, ChatGPT Images or Gemini’s Nano Banana are the easiest start — upload the photo, describe the change, and check the result at full zoom.
It can. Chat-style editors often return a resized image, so check the export resolution before you publish — Gemini’s Nano Banana Pro downloads at 2K on a paid plan, while free-tier outputs can be smaller. Photoshop keeps full resolution because it works on layers over your original file. Whatever tool you use, export PNG or WebP for graphics and JPEG at quality 85 or higher for photos.
Yes — removing a person is the same object-removal technique as removing a bicycle, and it is the most reliable AI edit there is. Brush the person out in Google Photos or Photoshop, or describe the removal in ChatGPT or Gemini. Check faces near the removal at 100% zoom afterwards, because regeneration can subtly shift the people you wanted to keep.
Editing photos you own is legal. Two limits apply: the U.S. Copyright Office’s January 2025 guidance says a prompt alone does not make you the copyright owner of purely AI-generated material, and you should not remove someone else’s watermark or edit a photo of a real person to mislead. Disclose AI edits when the photo is presented as a real record, and keep the original file.
Usually one of four reasons: the light or weather no longer matches the subject (an umbrella in sunshine), a face or text was regenerated and drifted, the skin was over-smoothed, or the edit changed something you did not ask about. Fix it by making one change per prompt, adding a preserve clause that names what must stay untouched, and checking the result at 100% zoom before you export.