How to Use Audacity: A Beginner’s Guide (Tested on Audacity 4)

Audacity is a no-cost, open-source audio editor and recorder for Windows, macOS, and Linux — and it is still the default first editor for podcasters, voiceover artists, students, and anyone who needs to clean up a recording without paying for a subscription. This guide shows you how to use Audacity from a blank install to a finished, exported file, and every step below was tested hands-on in Audacity 4.0.2, the current release.
In short: download Audacity only from the official site, pick your microphone in Audio Setup, press the red Record button (or R), edit by selecting audio on the timeline and cutting or splitting it, remove steady background noise with the two-step Noise Reduction effect, and export with File > Export Audio. The rest of this guide walks through each step with the exact menus, the defaults I measured, and the mistakes that waste the most time.
What Is Audacity (and What It Is Not)?
Audacity is a multitrack audio recorder and editor. You record or import sound, cut and arrange it on tracks, add effects, and export a finished file in formats such as WAV or MP3. It is open source under the GNU General Public License, and its own FAQ states that it “has always — and will always — remain free for everyone.” There is no account, no subscription, and no paywalled export.
What Audacity is not matters just as much. It is not a full digital audio workstation: it has no MIDI editing and no virtual instruments, so it cannot compose music the way a DAW can. For recording, cleaning up, and editing real audio — a podcast, an interview, a voiceover, a lecture — that limitation rarely matters. If you want a simpler single-purpose alternative, my hands-on Audacity vs Ocenaudio comparison tests both editors on the same recording and the same noise-reduction job.
One more boundary worth knowing up front: Audacity is desktop software only. There is no official Audacity app for Android or iOS, so anything offering “Audacity mobile” is not the real program.
How Do I Download and Install Audacity?
Get Audacity from one of two official places: the download page at audacityteam.org/download, or MuseHub, the official distributor for Audacity 4. The program is the same either way. I downloaded the Linux 64-bit AppImage of Audacity 4.0.2 from the official GitHub release, verified its SHA256 checksum against the release’s CHECKSUMS file, and launched it — the file is about 73 MB.
Do not download Audacity from third-party download sites. The official manual and every reputable guide agree on this point: unofficial installers are the main way people end up with bundled adware instead of the real editor. The download page lists Windows (Intel and ARM64), macOS (Universal), and Linux (64-bit AppImage) builds. As a rough guide to system requirements, Audacity needs Windows 10 or 11, macOS 11 or later, or a current Linux distribution, with 2 GB of RAM recommended.
Installation is unremarkable on purpose: run the Windows installer, open the macOS disk image, or — on Linux — make the AppImage executable and run it. On first launch, Audacity 4 shows a welcome dialog that walks through its cloud setup with Audio.com. You can skip it: the cloud account is optional, and ticking “Don’t show welcome dialog on startup” keeps it from appearing again. Nothing in this guide needs an account.
What Does the Audacity Interface Look Like?
Audacity 4 redesigned the window around two tabs at the top left: Home, where projects live, and Project, where the editing happens. The Project view is the one you will live in. Across the top sits the menu bar (File, Edit, Select, View, Record, Tracks, Generate, Effect, Analyze, Tools, Help) and the transport toolbar with Play, Stop, and the red Record button. Below that is the timeline with its time ruler, and on the left is the track control panel, with the track name, volume slider, and Mute and Solo buttons.
The most important strip for beginners is the selection bar at the bottom. It shows exactly where your selection starts and ends, in hours, minutes, and seconds, and its duration. When a tool behaves unexpectedly, the selection bar usually explains why: most Audacity effects act on the current selection, so a stray selection is the cause of most “nothing happened” moments. The track in my test below is a 30-second clip, and the selection bar reads 00h00m00.00s to 00h00m30.00s when the whole clip is selected.
Two details from my own testing are worth knowing before you start. First, Audacity 4 saves projects in the .aup4 single-file format, which replaced the older .aup-plus-data-folder arrangement — one file to copy or back up instead of a folder. Second, the toolbar’s time display follows the playhead, so clicking anywhere on the waveform moves the cursor there; clicking and dragging selects a time range.
How Do I Record My First Audio in Audacity?
Recording in Audacity is four steps, and the only one beginners get wrong is the second.
1. Plug in your microphone before opening Audacity. If you connect it afterwards, use Transport > Rescan Audio Devices, or restart the program — Audacity lists devices when it starts.
2. Choose the right input and output. Click Audio Setup in the top toolbar and set the Recording device to your microphone by name, and the Playback device to your headphones. The official manual calls headphones “more important than the microphone,” because speakers feed your recording back into the mic. If you hear nothing on playback later, this is the first setting to check.
3. Set a healthy level. Open the microphone level control and speak at the volume you will actually use. The manual recommends peaks between −18 dB and −6 dB: loud enough to stay clear of the noise floor, with headroom below 0 dB, where audio clips — and clipping cannot be repaired afterwards. The built-in microphone on a laptop is fine for a first take; a USB microphone plugs straight in, while an XLR microphone needs an audio interface between it and the computer.
4. Record, then stop. Press R or click the red Record button and speak. Press Space or the Stop button when you are done. Audacity drops the recording onto its own track as a clip you can drag by its edges.
One habit saves more recordings than any effect: record five to ten seconds of room tone before you speak. Sit still, say nothing, and let the microphone capture the room. That quiet stretch becomes the noise profile in the next section, and it is the difference between clean noise reduction and a filter that eats your voice. If you are recording a podcast, pair this with the setup in my best podcast editing software for beginners guide, which covers the full recording chain around Audacity. If you are building the whole show with AI — script, voice, editing, and hosting — see how to use AI to create a podcast.
How Do I Edit Audio in Audacity?
Almost all Audacity editing is the same loop: select a stretch of audio, then do something to it. The official manual’s basic editing guide covers the same ground, and the version below is what I verified by doing it. Click in the waveform and drag to select. Click a clip’s header — the strip along the top — to select the whole clip. Press Ctrl+A to select everything on every track.
Cut, copy, and paste work the way they do in a text editor: select audio, Ctrl+X to cut it, Ctrl+C to copy, Ctrl+V to paste it at the cursor. Deleting a selection either leaves a gap or, with ripple-style editing, pulls the remaining audio together. Split (Ctrl+I, or the scissors tool in the toolbar) cuts a clip into two clips at the cursor so you can move or delete one half. Trim works from the clip’s top handles: drag an edge inward to shorten a clip without deleting anything permanently.
Fades sit under Effect > Fading, and the two you will use most are Fade In and Fade Out — select the first or last second of a clip and apply one to remove the click of a hard start or ending. Clip gain, the small handle on each clip, drags a clip’s volume up or down without touching the rest of the track, which is the fastest way to even out a loud and a quiet speaker. And Undo (Ctrl+Z) steps back through your edits one at a time — Audacity remembers the whole session, not just the last change, so experiment freely.
A practical order for a first edit: cut the mistakes and long pauses, split out the section you want to move, fade the ends, and only then reach for effects. Effects are easier to judge on a clean timeline than on a recording that still contains three false starts.
How Do I Remove Background Noise in Audacity?
Noise Reduction is Audacity’s most useful effect and its most misunderstood one. It works in two passes, and the first pass is everything: you show Audacity a stretch of the recording that contains only the noise — hiss, hum, air conditioning — so it can learn the spectrum to remove, and then you apply the filter to the audio you want to keep. It suits constant background noise. It will not remove one-off sounds such as a door slam, and it cannot remove echo.
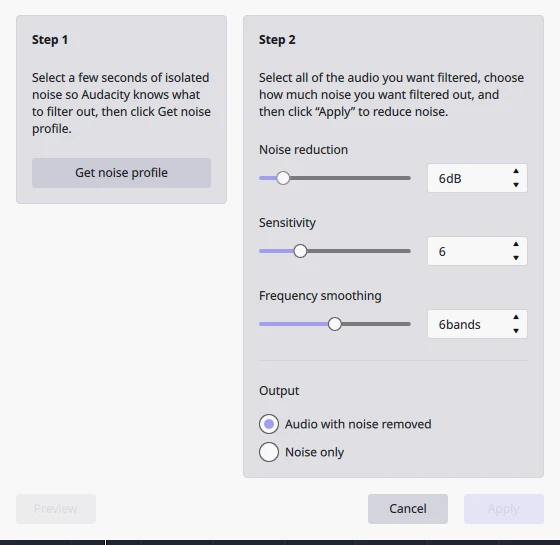
Step 1 — Get the noise profile. Select a few seconds of isolated noise. The manual requires a minimum of 2,048 samples — about 0.05 seconds at 44.1 kHz — but one to two full seconds gives a much cleaner fingerprint, and a longer profile is better. Then open Effect > Noise removal and repair > Noise Reduction and click Get noise profile. The dialog closes immediately; that is normal, and it means Audacity stored the profile in memory. The profile is not kept when you close Audacity, so capture a fresh one every session.
Step 2 — Apply the filter. Select all of the audio you want cleaned (Ctrl+A), open Noise Reduction again, and click Apply. The sliders default to 6 dB of reduction, sensitivity 6, and frequency smoothing of 6 bands in Audacity 4.0.2, and the manual recommends using the lowest reduction value that gets the noise to an acceptable level. For spoken voice, 6–12 dB is the usual range; pushing the slider toward its 48 dB maximum is how voices start sounding hollow and watery.
I tested this on a 30-second clip I built for the purpose: five seconds of room tone followed by a steady tone standing in for a voice, over a pink-noise bed. Here is what Audacity 4.0.2 did at its defaults, measured with audio statistics on the exported files:
| Measurement (mean volume) | Before Noise Reduction | After (defaults: 6 dB, 6, 6) | Change |
|---|---|---|---|
| Room-tone head (first 5 seconds, noise only) | −45.2 dB | −46.9 dB | 1.7 dB quieter |
| Voice section (25 seconds, tone + noise bed) | −29.8 dB | −33.3 dB | 3.5 dB quieter |
That modest result is honest, and it teaches the right lesson: the 6 dB default is gentle, and how much it removes depends on the noise itself. On a louder, hissier test clip — a 60-second recording with a white-noise bed — the same defaults cut the room tone from −40.8 dB to −52.0 dB, an 11.2 dB reduction, in a separate test on the same machine. Steady hiss disappears fast; quiet low-frequency room tone takes a higher setting. If the defaults leave audible hiss, raise the Noise reduction slider toward 12 dB and preview before applying — and always preview, because the undo is free but a re-record is not.
The mistake to avoid is profiling the wrong audio. On my first attempt, the noise selection ran 0.33 seconds past the room tone and caught the start of the voice. The result: the voice section came out 4.6 dB quieter, because the filter had learned that the voice itself was part of the noise. The manual warns about exactly this — if the profile contains any of the wanted audio, that content is treated as noise too, and the filter will eat into it. Keep the profile strictly inside the silence, with a margin on both ends.
How Do I Export Audio from Audacity?
Exporting is where beginners lose the most work, because saving and exporting are two different things in Audacity. File > Save saves the project — the .aup4 file with your tracks, clips, and edits, which only Audacity can open. File > Export Audio (Ctrl+Shift+E) writes a finished audio file other apps can play. Save early and often while you edit; export only when the audio is done.
The export flow in Audacity 4 asks “How would you like to export?” first. Ignore the “Share to audio.com” card unless you want a shareable link; choose “Export to computer.” The export panel then offers the format, channels, sample rate, and encoding. WAV is the default: 44.1 kHz, signed 16-bit PCM, mono or stereo to match your track. MP3 is one click away in the Format dropdown, and the panel also lists Ogg Vorbis, Opus, FLAC, WavPack, M4A (AAC), AC3, and WMA — no separate encoder download is needed for MP3 in current Audacity.
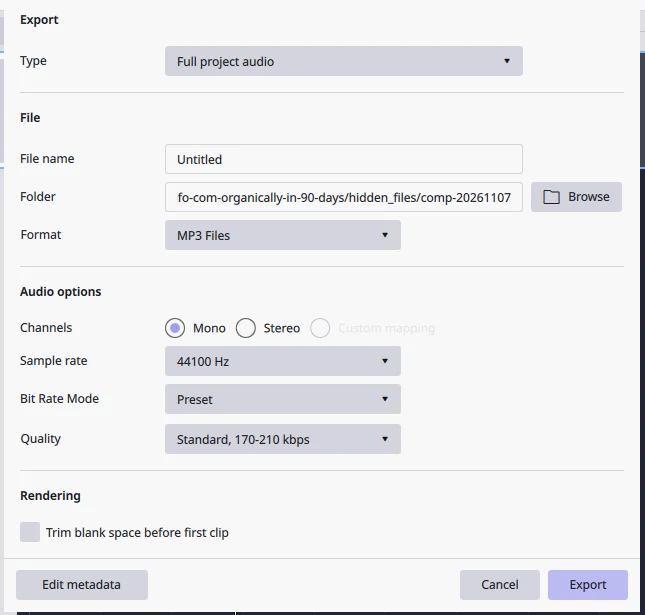
Which format should you pick? WAV for anything you will edit again — it is uncompressed, so it keeps every detail and costs disk space. MP3 for sharing — a finished podcast episode, a voiceover delivered to a client, a file sent by email. I exported the same 30-second test clip both ways from Audacity 4.0.2 to measure the difference:
| Export format (same 30-second mono clip) | Settings | File size | Use it for |
|---|---|---|---|
| WAV (Microsoft) | 44.1 kHz, signed 16-bit PCM | 2,646,150 bytes (~2.5 MB) | Editing again, archiving, mastering |
| MP3 | Preset, Standard 170–210 kbps (VBR) | 326,272 bytes (~319 KB) | Sharing, publishing, sending to clients |
The MP3 came out roughly eight times smaller than the WAV for the same audio, which is the trade in one number: WAV keeps everything and costs space, MP3 throws away what the ear barely notices and costs almost nothing to send. For a typical 30-minute podcast episode, that ratio is the difference between a ~150 MB WAV and an ~18 MB MP3. If your audio also needs video, Clipchamp is the natural next step for editing the picture around the sound, and OBS Studio is the tool to record the screen and microphone together before Audacity cleans up the audio.
What Are the Most Useful Audacity Shortcuts?
Audacity rewards a small set of shortcuts. These are the ones I used while testing, and they cover nearly all beginner editing:
| Shortcut (Windows / Linux) | What it does |
|---|---|
| R | Start recording |
| Space | Play or stop |
| Ctrl + O | Open or import an audio file |
| Ctrl + A | Select all audio on all tracks |
| Ctrl + X / C / V | Cut, copy, paste the selection |
| Ctrl + I | Split the clip at the cursor |
| Ctrl + Z | Undo the last edit |
| Ctrl + Shift + E | Export audio |
On a Mac, use Cmd in place of Ctrl. The full shortcut list lives under Edit > Preferences > Keyboard, where you can also reassign anything that conflicts with a habit from another editor.
Audacity 4 vs Audacity 3: What Changed?
Most existing Audacity guides still describe version 3, and Audacity 4 — released in September 2026, with 4.0.2 the current patch release — is a different app in several ways that matter to a beginner. The window was redesigned around the Home and Project tabs. Clips are dragged by their edges and headers instead of the older clip-handle system. Effects can run in real time while audio plays. Projects save as a single .aup4 file. And Noise Reduction moved from the top level of the Effect menu into Effect > Noise removal and repair — the single most common reason a version-3 tutorial sends a version-4 user to the wrong place.
The new version is also less forgiving about one thing: the OpenVINO AI effects that some version-3 users relied on for AI noise suppression do not work in Audacity 4.0.x, so if an old guide tells you to install them, skip that step. The built-in Noise Reduction above is the supported path in version 4.
What Can’t Audacity Do?
A fair guide names the limits. Audacity has no MIDI editing and no virtual instruments, so it cannot compose or sequence music. Its Noise Reduction only handles constant noise — a changing background such as traffic or a room with people talking will not clean up well, and there is no built-in tool for removing echo. The noise profile is not saved between sessions, so every new session starts with capturing a fresh one. Long files are fine — a 90-minute, 476 MB WAV opened in about 11 seconds in a separate test on the same machine — but Audacity copies imported audio into its project format, so importing a very long file takes a moment up front. And there is no official mobile version: if you need to edit on a phone, Audacity is not the tool.
None of that changes the recommendation for the job this guide covers. For recording a voice, cutting mistakes, removing steady hiss, and exporting a clean MP3, Audacity remains the capable no-cost option — and the one whose workflow you now know end to end. Start with one real recording, run the noise-reduction pass on it, and export it both ways; the difference between the WAV and the MP3 on your own file will teach you more about export settings than any table can.
Frequently Asked Questions
Yes. Audacity is open-source software released under the GNU General Public License, and its own FAQ states that it has always — and will always — remain free for everyone. There is no subscription, no paywalled export, and no account required to record, edit, or export. Optional extras distributed through MuseHub, the official distributor, do not change that.
Yes, when you download it from the official sources: the download page at audacityteam.org or MuseHub, the official distributor. Avoid third-party download sites, which are the main source of modified installers bundled with adware. I verified the Linux AppImage I tested against the release’s published SHA256 checksum before running it.
Audacity 4.0.2 is the current release, and it is the version this guide was tested on. Audacity 4 was released in September 2026 with a redesigned interface, real-time effects, and the single-file .aup4 project format. If a tutorial you are following describes version 3 menus, expect differences — most notably, Noise Reduction now lives under Effect, then Noise removal and repair.
Not with one click. Noise Reduction is a two-step effect: first select a few seconds of noise only and click Get noise profile, then select the audio you want cleaned and click Apply. It works on constant background noise such as hiss, hum, and fan noise. It will not remove one-off sounds like a door slam, changing noise like traffic, or echo. Start with the 6 dB default and raise it toward 12 dB only if the hiss survives.
Almost always, the wrong input device is selected. Open Audio Setup in the top toolbar and set the Recording device to your microphone by name — not the built-in microphone or a webcam mic — and the Playback device to your headphones. Then check the microphone level while speaking: the manual recommends peaks between minus 18 dB and minus 6 dB. If the meter does not move at all, the mic is either unplugged or muted at the system level.
Export WAV when you will edit the audio again — it is uncompressed, so it keeps every detail. Export MP3 when you are sharing or publishing — the same 30-second clip measured 2,646,150 bytes as a WAV and 326,272 bytes as an MP3 in my test, roughly eight times smaller. Audacity’s MP3 default is Variable Bit Rate at Standard quality, 170 to 210 kbps, which is fine for voice. Remember that saving and exporting are different: File, then Save, keeps the editable project, while File, then Export Audio, writes the finished file.